Security Configuration

The MICAS Agent Security Configuration will demonstrate how to create roles and users to control access to features of the MICAS Agent based on a local or Windows Active Directory environment.
Overview
Up to version 3.5.9, the MICAS Agent had no authentication, and any user could access any page within the Agent.
Version 4.0.2 and future versions implemented authentication and authorization (users and roles). Access to pages (and edit function within pages) can be controlled per-role, and users can be assigned to a role to control their access rights.
The Authorization function can be enabled (or disabled) in the “Security Settings” page, which can be accessed by clicking the “Security Settings” link in the system information page.
Setup and Configuration
By default, MICAS Agent is configured to provide full access to all pages (no authentication).
1. To enable authentication, use the Security Settings link in the top-right of the System Information page to navigate to the Security Settings page.
3. On the post-authentication log in page, enter administrator username "admin" and leave password blank. Click Login.
Windows Authentication
Important: Prior to enabling Windows Authentication in the Security Settings page, an Active Directory Group (AD group) called “MICAS Agent Administrators” must be created on the location’s network Active Directory. Any user within this AD group that logs into the MICAS Agent for the first time using the Windows Login will automatically be assigned the MICAS Agent Administrators role.
1. To enable Windows Authentication, use the Windows Authentication Enabled? in the General panel on the Security Settings page. Click Save to enable a Windows Login button on the login page.
2. Enter your Windows Authentication (MICAS Adminstrators Group) credentials and click Windows Login.
3. When you log in using Windows Authentication:
- A user account will be automatically created in the MICAS Agent Database.
- If you are a member of the “MICAS Agent Administrators” role in Active Directory, the user account will be automatically assigned to the MICAS Agent “Administrators” role, with access to all functions.
- If you are not a member of the “MICAS Agent Administrators” role the automatically-created account is not assigned to any role, and your account is not able to access any protected functionality.
Default Roles
By default, the Agent database contains two roles and two users:
- Administrators - Members of the Administrators role have access to all functions.
- Anonymous - The Anonymous role is used to control access rights (Authorization) for users who are not logged in.
The admin user has a blank password. The anonymous user represents users who are not logged in (and is not editable).
Configuring Roles
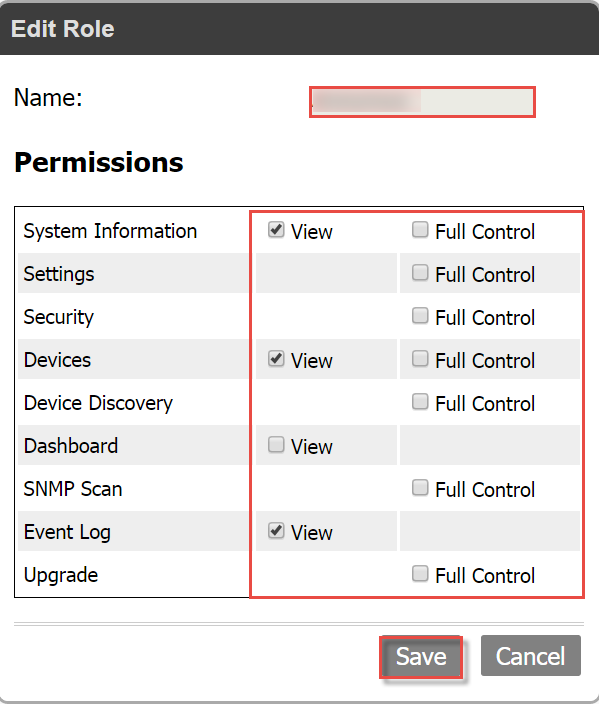
1. If required, create a new role in the Role panel by clicking the New Role button.
Note: The Administrators role cannot be edited, and both the Administrators and Anonymous roles cannot be deleted.
2. Enter a role name and select appropriate permissions. Click Save.

Configuring Users
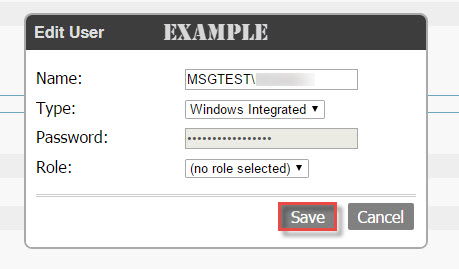
1. From the Users panel, create additional users by clicking New User
Note: The anonymous users cannot be used.
2. The table below describes the Standard and Windows Integrated (AD Group) configuration.
After edits are made, click Save.
| Name | Standard: User’s name is the same name used in login screen. Windows Authentication: Include the DOMAIN\ prefix before user name. (See Example) |
| Type | Standard: Uses user name and password from the Agent database. Windows Integrated: Used for active directory users and do not have a password. Once saved, the user type cannot be changed. |
| Password | User’s password used in the login screen or assigned in AD. |
| Role | Assigned Role. |

Permissions Checking
In general, the links for all pages are available (even if you do not have access rights). When you click a link, a permissions check is executed:
- If you are not logged in, and the page is not available for anonymous users, the user is redirected to the login screen.
- If you are logged in but do not have rights to view the page, the user is redirected to the Access Denied page.
- If you have page view permissions, but do not have Full Control permission, editing functions are disabled.
Changing Password
Windows Authenticated users do not have a password within MICAS Agent. Standard users can change their password by logging in and then clicking their name at the top-right of the System Information page (next to the Logout link).
System administrators (users with Full Control permissions for the security page) can update any user’s password (except for Anonymous).


